|
|
|
|

Revision Date:

Copyright
ã2005 Key Eleven, LLC
Table of Contents
1. Restoring
Factory Default Settings
2. Allowing Storage
of User Settings
3. Display the
Current IP Address
Setting the WebIO IP Address Using the WebIO Network Setup
Utility
Setting the WebIO IP Address Using a DHCP Server
Getting an IP Address from a DHCP server
Manually Setting the WebIO IP Address Using ARP and Ping
Setting a Static IP Address (When no DHCP Server is
Available)
WebIO Detailed Manual Network Setup
WebIO Introduction
The WebIO is designed to provide both local and remote control of lamps, appliances and other electrical devices in the home or office. The WebIO utilizes X10 technology to send signals down existing power lines to other X10 modules. The WebIO contains a built-in web server allowing remote users with Internet access to connect to the WebIO with a web browser, giving the remote user control of local X10 devices. Local control is provided through a web browser for clients attached to the same Local Area Network (LAN) as the WebIO.
The WebIO’s built-in web server allows users to select an X10 module’s House code, Unit code, and Function code. When the page is submitted, the WebIO transmits the X10 address and function onto the AC power line. The addressed X10 module will receive and execute the transmitted X10 function.
The WebIO communicates with X10 modules that support On, Off and query functions. This includes appliance modules, lamp modules, dry contact modules, and many others. See a complete listing of available X10 modules at www.SmartHome.com.
WebIO Networking
The WebIO provides an RJ45 interface for an Ethernet connection to a LAN. An IP address may be assigned from a DHCP server or a static IP can be set through the WebIO Setup Utility.
For remote monitoring and control, the WebIO requires a routable Internet connection. This allows a user to connect to the WebIO from anywhere in the world via the Internet.
X10 Modules
X10 modules plug into an AC receptacle that provides power to the module and controlled devices.
The AC power line provides the path for modules to send and receive control messages. Each X10 module on the AC power line network is addressed with a House code and Unit code combination. There are 16 House codes labeled with a letter in the range of A-P. Unit codes are labeled 1-16. Different X10 modules support different Function codes, such as On, Off, Dim, and State Query.
WebIO Example Setup
The
diagram below displays an example setup and operation of the WebIO:

WebIO Hardware Setup

Rear View of WebIO
Ethernet Connection
The WebIO provides an RJ45 jack for the Ethernet connection to your Local Area Network. The left LED of the RJ45 jack will light when the WebIO is correctly connected to your LAN.
X10 Interface
The WebIO provides an RJ11 interface for connection to a PowerLinc X10 transceiver, which also provides power for the WebIO.
A version of the WebIO with an optional barrel connector will support the TW523 X10 transceiver. When using a TW523, a 12volt dc adapter must be used to provide power to the WebIO.
Program Switch
The Program Switch located on the rear of the
WebIO is used to perform the following functions:
- Restore factory default settings.
- Allow storage of user settings.
- Display current IP address
1. Restoring Factory Default Settings
To restore the
WebIO to factory default settings perform the following tasks:
a. Remove power.
b.
Switch
the Program Switch to the Program (Prg)
position
c.
Reapply
power. The WebIO boot process will
display the message "Factory Default".
d.
Set the
switch back to the Off position.
Restoring to
factory defaults removes the user set static IP address. The factory default is to accept an IP from a
DHCP server. Restoring to factory
defaults also clears any user-set pass code.
2. Allowing Storage of User Settings
Setting the
Program Switch to the Prg position while the
WebIO is powered allows the user to program a static IP address as well as a
pass code as described later in this manual.
The WebIO will save the user-set IP address and pass code to FLASH
memory for recall even if power is lost and restored.
This function of
the Program Switch is used for security.
Remember to set the Program Switch to the normal (Off) position
after programming to prevent unauthorized remote users from reprogramming the
WebIO.
3. Display the Current IP Address
The program switch
is also used to display the current IP address of the WebIO. Switching to any position will update the
display with the WebIO current IP address.
Remember to set
the Program Switch to the normal (Off) position to prevent unauthorized
remote users from reprogramming the WebIO.
WebIO Network Setup
The WebIO can operate with either an IP address obtained from a DHCP server, by using the WebIO Network Setup Utility, or by using the utilities ARP and Ping.
Setting the WebIO IP Address
Using the WebIO Network Setup Utility
The WebIO CD-ROM includes an installation program for the WebIO Network Setup Utility. The installation program and the WebIO Network Setup Utility will run on Windows 9x, 2000, and XP. The WebIO Network Setup Utility provides for an easy IP address setup
For installation of the WebIO Setup Utility, run “setup.exe” from the WebIO CD-ROM. After installation run the WebIO Setup Utility from your Windows Program menu.
Running the WebIO Network Setup Utility displays the following form:
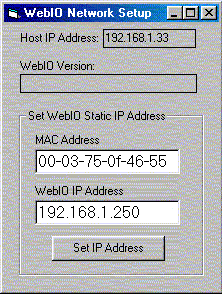
- In the MAC Address field, enter your unique MAC address found on the bottom of the WebIO.
- In the WebIO IP Address field enter the desired IP address to be assigned to the WebIO.
- Click the Set IP Address button. After a few moments a message will notify success or failure.
On success the WebIO Version field will display the WebIO firmware version.
Note: This Application uses ARP and Ping behind the scenes as described in Appendix A.
To instruct the WebIO to store its IP address in Flash memory, see the section titled “Store a Static IP address”.
Setting the WebIO IP Address
Using a DHCP Server
Getting an IP Address from a DHCP server
The WebIO will accept an IP from a DHCP server.
Switch the WebIO program switch to display its current IP address on the LCD.
If the WebIO shows an IP address of 0.0.0.0 then an IP address has not been received. It can take many seconds to receive an IP from a DHCP server.
When using DHCP with WebIO, Internet routing to the WebIO may not be practical in the case where WebIO is power cycled (rebooted) and then receives a different IP address then previously assigned. Also Routers may not have the ability to forward to an IP address in the range of the DHCP assigned address. To avoid this problem when using a router with DHCP enabled it is best to us a static DHCP service (or Bootp service) where the DHCP server assigns a defined IP address to the WebIO based on the WebIO MAC address.
Note: WebIO prioritizes DHCP over static, regardless of the WebIO Lock switch position. If you assign WebIO a static IP address on a network with a DHCP server, WebIO will accept a new IP address received from the DHCP server. To use WebIO’s static IP function, you need to not have a DHCP server (not so practical) or have the DHCP server always assign the same IP dependent on MAC address. (Static DHCP/bootp).
Manually Setting the WebIO
IP Address Using ARP and Ping
Setting a Static IP Address (When no DHCP Server is Available)
ARP and Ping can be used to set the WebIO IP address. There must not be a DHCP or BOOTP server on the same network as the WebIO when using this method for setting the IP address.
Windows 9x example:
IP for WebIO: 192.168.1.25
MAC for WebIO: 00-03-75-1f-0c-9f
PC’s IP address: 192.168.1.150
1.
Enter the desired IP address for the MAC address
of the WebIO into your PCs ARP table.
From a Windows command prompt Enter:
arp –s 192.168.1.25
00-03-75-1f-0c-9f 192.168.1.150
2.
Ping the IP address of the WebIO by entering the
following command at a Windows command prompt.
ping 192.168.1.25.
When received, the WebIO will accept this address.
For more information on setting an IP address see Appendix A.
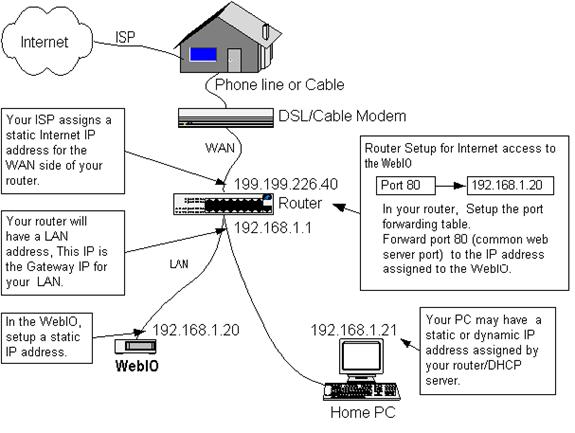
Routable Network Setup
To setup the WebIO for remote Internet access, the WebIO will need to be assigned either an Internet IP address, or more commonly, placed behind a router (LAN side) that has an Internet IP address and is configured to forward an IP port to the IP address of the WebIO. This method is referred as “router port forwarding”.
Router Setup (router port forwarding)
Most
routers have a feature that allows a user-configuration for port
forwarding. Port forwarding is used to
allow an outside request from the Wide Area Network (WAN) side of the router to
be routed to a specific IP address of a device or computer existing on
the inside router network, referred to as the Local Area Network (LAN).
Message requests sent over a TCP/IP network (such as the Internet) use port numbers as a way to specify a specific service on a server. For example, a Web service will listen on port 80 where as an email service on the same server will listen on port 25. This way a message directed to the server using an IP address will specify a port number to direct the message to the appropriate service (web service or e-mail service). As another example, when a web browser asks a web server for a web page, the browser sends a message to the server, referring to its IP address and referring to the web services port number on the server. By default a web browser sends requests to port 80, the default port used by web servers.
When setting up a router to forward a port to the WebIO, using the default of port 80 is suggested. However the WebIO will accept an HTTP connection on any port, allowing for router setup in the case that an existing web server on the LAN side of the router is already assigned to port 80. The WebIO would then need to be assigned to a different port such as 81 or 8080.
When using a port other than 80, you will need to specify the port number on the browsers URL using “:” {and port number}. For example to specify port 91 at IP address 192.168.1.10, enter: http://192.168.1.10:91
Below is a network topology diagram that should help in understanding router setup:
Using the WebIO
WebIO Functions
The WebIO includes an embedded web server, which provides its interface to the user via a web browser.
The interface provides links for:
1. Controlling X10 Devices
2. Setting the LCD messages
3. Setting a Static IP address
4. Setting a User Passcode
Controlling X10 Devices
The web interface provides two methods for controlling X10 Devices.
The Control X10 Labeled Devices page (shown below) allows for easy control of X10 On/Off commands for predefined X10 devices.
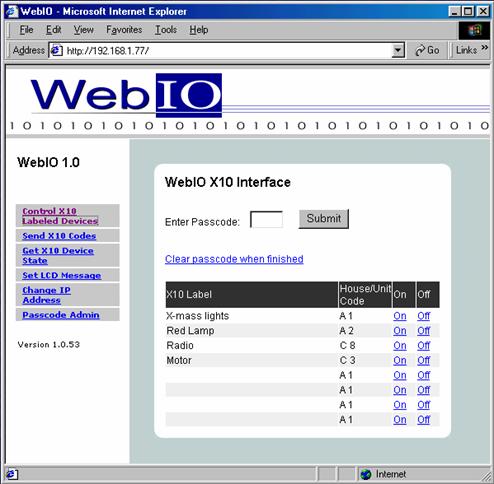
The Control X10 Labeled Devices page (above) shows a table of predefined X10 Devices. The On and Off columns contain links for setting the On/Off state of the device in the selected table row.
When a WebIO pass code is set, the On/Off links will not trigger X10 commands until a pass code is entered in to the Enter Pass code field and the submit button is clicked. After the pass code has been submitted the Clear pass code when finished link must be selected to re-lock the WebIO X10 operation.
Creating Device Labels
The WebIO Device Label list is defined using the WebIO Network Setup Utility.
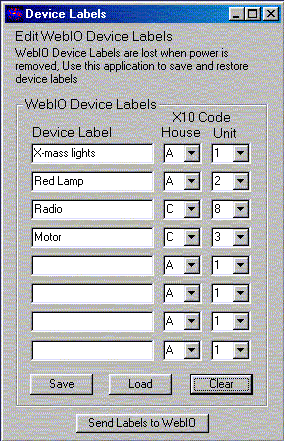
To define an X10 device, enter a name in one of eight Device Label fields and select the House and Unit code for the device from the appropriate drop list box. After completing the Device Label table, click the Send Labels to WebIO button to send the device labels to the WebIO. Next use a web browser to verify your device labels have been successfully sent to the WebIO Control X10 Device Labels page.
Device labels are not stored in the WebIO Flash memory. Upon rebooting the WebIO the device labels will be lost, requiring the WebIO Setup application to be used again to restore the device labels. The Save button is used to store your device label definitions on your PC. The Load button will load your last saved device labels.
Manual X10 Control
Another method for controlling X10 devices is to use the Send X10 Codes web page. This page allows for manually selecting X10 device House code, Unit code, and the Command to be sent.
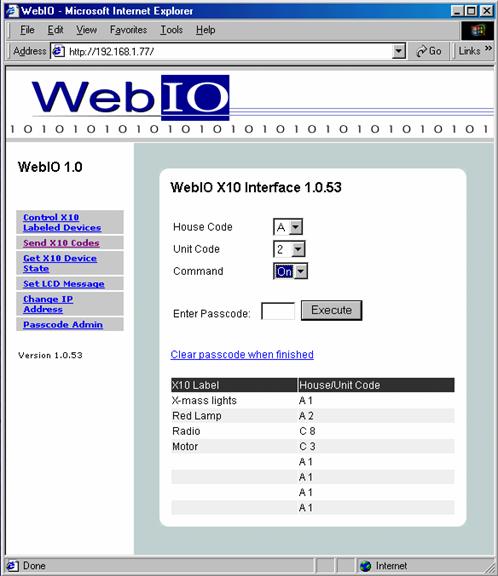
To execute an X10 function, select House code, Unit code and Command from the drop list boxes then click the Execute button.
When a
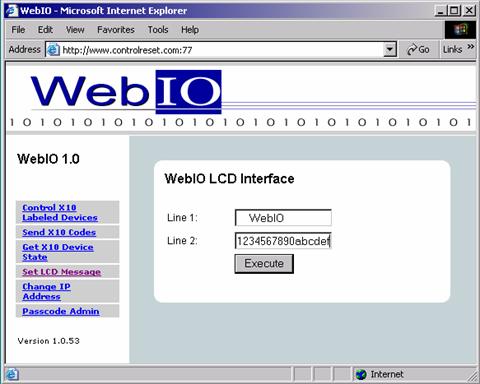
Setting the LCD Message
The Set LCD Message page provides an interface for displaying messages on the WebIO LCD display. The LCD will display 2 lines of 16 characters.
To display a message, enter the message into the Line 1 and Line 2 text boxes, then press the Execute button.
Storing a Static IP Address
The WebIO can be configured to remember its static IP address, even when power is cycled. This is useful when a DHCP server is not available to assign the WebIO an IP address, or you do not want to manually assign an address each time the WebIO is power cycled. Another use for assigning a static IP address is when a router or other software process needs to know the WebIO IP address for routing messages.
The WebIO, Change IP Address page provides an interface for saving an IP address to the WebIO FLASH memory.
To save an IP address:
- Move the WebIO Program Switch to the program position.
- From a browser go to the WebIO Change IP Address page, enter the IP and submit the page. Note the LCD message displaying the static IP.
- Switch the Program Switch back to the Off position to prevent remote programming and prevent the restoration to factory defaults on reboot.
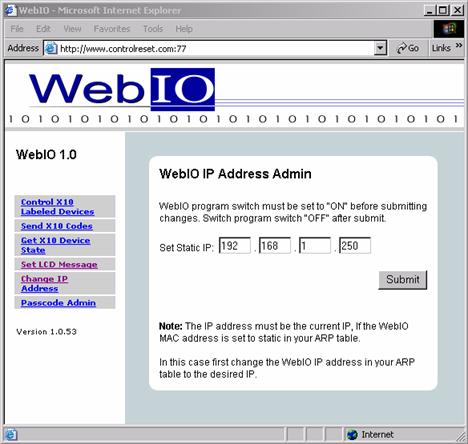
Note: If you used ARP to set an IP address for the WebIO, the WebIO IPAdmin page will only accept the same IP in your PC’s ARP table. To assign a different IP address to the WebIO, first clear your ARP table using arp –a to display your ARP table and arp –d {IP address to delete}, to remove an IP address before using the above procedure to save a different IP address for the WebIO.
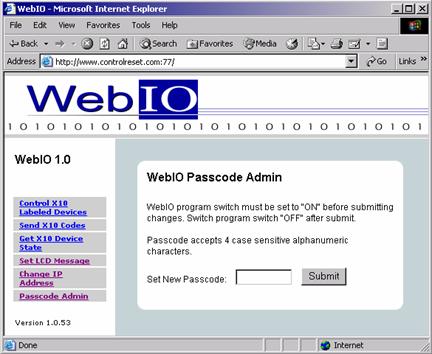
Setting a User Passcode
The WebIO can be configured with a passcode
for preventing unauthorized control of X10 devices. When a passcode is
set both the Control X10 Labeled Devices
and the Send X10 Code web pages
will require the passcode field to contain the
correct passcode to send an X10 command. When the passcode
is incorrect the WebIO gives no indication of invalid passcode
and no indication that it did not perform the X10 command. To verify a device state, use the Get X10
The WebIO, Passcode Admin page provides an interface for saving an passcode to the WebIO FLASH memory.
Setting
a WebIO Passcode:
1. Move the WebIO Program Switch to the program position.
2. From a browser go to the WebIO Passcode Admin page, enter a 4 character alphanumeric (case sensitive) passcode and submit the page. Note the LCD message displaying acceptance or failure of the new passcode.
The WebIO will only uses the first four characters when a passcode of more than 4 characters are entered.
3. Switch the Program Switch back to the Off position to prevent remote programming and prevent the restoration to factory defaults on reboot.
When a passcode is set, the WebIO will display the passcode on the LCD for 2 seconds when power is applied.
To remove a passcode the WebIO
must be restored to factory defaults.
See the section titled “Restoring Factory Default Settings”
WebIO Security
The WebIO passcode provides a minimum amount of security. All WebIO information including the passcode sent from a users web browser to the WebIO web server is not encrypted, this means that it is possible for someone with the right tools and knowledge could discover your passcode. For this reason it is not suggested that a WebIO open to the Internet (Internet routable) be used for critical applications such as controlling a thermostat.
Even though the WebIO doesn’t provide high Internet security, there are methods for adding high security that are beyond the scope of this manual.
Two examples of a secure WebIO setup:
- Virtual Private Network (VPN) can be setup that provides an encrypted tunnel over the Internet between a remote users computer or LAN and a local router of which the WebIO is hiding behind.
- The WebIO can be hidden behind a secure web server, which relays remote messages to the WebIO.
Appendix A
WebIO Detailed Manual
Network Setup
LAN setup with DHCP:
- Connect WebIO to a 10/100BT hub or switch. The left green LED of the WebIO RJ45 jack will light when correctly connected.
- After about 5 seconds the WebIO will indicate its IP address. An IP address of 0.0.0.0 indicates the WebIO had not yet received and IP address for the DHCP server. It can take a minute or more for the WebIO to receive and IP address.
- Change the position of the Program Switch to update the display with the current IP address. After receiving an IP address, the program switch should be set in the normal (off) position to prevent reset to factory default if rebooted and to lock out unauthorized remote programming.
- Connect to the WebIO using a web browser. Connect to the URL of the WebIO by manually typing its IP address: http://{IP address}
For example: http://192.168.1.100
- A successful connection will display the main WebIO page.
- At this time you may choose to set a Static IP (see instructions: Setting Static IP Address). Without a Static IP, upon reboot of the WebIO it may receive a different DHCP assigned IP address.
Note: WebIO prioritizes DHCP over static, regardless of the WebIO Lock switch position. If you assign WebIO a static IP address on a network with a DHCP server, WebIO will accept a new IP address received from the DHCP server. To use WebIO’s static IP function, you need to not have a DHCP server (not so practical) or have the DHCP server always assign the same IP dependent on MAC address. (Static DHCP/bootp).
LAN Setup without DHCP:
- This setup requires the use of ARP. A DHCP or BOOTP server must not be present as these will interfere with an ARP command. If either a DHCP or BOOTP server exists, connect the WebIO using a crossover cable to a PC.
- Connect WebIO to a 10/100BT hub or switch. The left green LED of the WebIO RJ45 jack will light when correctly connected.
- Use ARP and Ping to assign an IP address to the WebIO. From a PC running Windows, open a command window.
- Obtain your IP address:
i. Under Window9x, Enter: ipconfig
ii. Linux, Enter: ifconfig
- Enter the IP address and MAC address of the WebIO into your ARP table: arp –s {WebIO IP address} {WebIO MAC address} {your PC IP address}.
i. Windows 9x Example:
arp –s 192.168.1.101 00-aa-00-62-c6-01 192.168.1.10
ii. Linux Example:
arp –s 192.168.1.101 00:aa:00:62:c6:01 192.168.1.10
- Assign the IP address to the WebIO, Enter: ping {WebIO IP address},
i. Example: ping 192.168.1.100
- If the ping receives a reply, then the WebIO has received the IP address. If no reply is received, see Troubleshooting - Assigning IP address using ARP and Ping.
- Verify that the WebIO has received the IP Address (ensure the reply is not from another device). Change the position of the Program Switch to update the display with the current IP address. The Assigned IP address should be displayed.
- Connect to the WebIO using a web browser. Connect to URL: http://{IP address} for example: http://192.168.1.100
- A successful connection will display the main WebIO page.
- At this time you should assign a Static IP address (see instructions: Setting Static IP Address). Without a Static IP, upon reboot of the WebIO it will look for a DHCP server or default to IP 0.0.0.0.
- If using a crossover cable, the WebIO can now be plugged into the LAN with no need to power down.
Product Information
For more information and software updates, visit the WebIO web site:
or contact:
Attn: Torrey Vigesaa
Key Eleven, LLC
![]()
Copyright
ã2005 Key Eleven, LLC
Windowsâ is a registered trademark of Microsoft Corporation